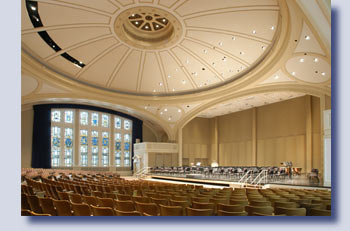
Great conference room photos
![]()
Retouching
your systems photos![]()
Once you have all your conference room shots downloaded to your computer (and color corrected if you're shooting in RAW mode),
it's time to put together the finished images.
![]()
You
may want to look at this example
as you read through the following explanation.![]()
Part
II: Working in PhotoShop![]()
1.
As you sort through your dozens of exposures, think through which you’ll use
for each section of the final image. Often you can get by with only two or three
exposures, plus any screen images.
![]()
2.
I most often start with the darkest exposure I want to use on the bottom layer
in PhotoShop. I’ll lay the lightest above that and let the sections I want to
darken show through to various degrees. Of course to do this, you have to be sure
your exposures line up exactly (that’s why you can never move your camera between
exposures). Save any cropping for later.![]()
3.
One simple way to select what shows through is to use the eraser set on reduced
flow and/or opacity. This technique works well if you have a highlight resulting
from a light shining too brightly on one area. Probably you’ll need to set the
eraser at about 5% - 10% flow to get a gradual blend. Pick a brush size that’s
roughly half the size of the area you’ll be darkening. Now just gradually ‘rub’
the light area and the area around it until the light blends seamlessly into the
dark. ![]()
4. If you need
a sharp edge between the light and dark, then you’re going to need to select a
specific area and either erase only within that area or delete the whole section
so the darker shows through. (That's what I did with the windows in the shot on
this page.) Don’t be afraid to use technique #3 within a defined area.![]()
5. Sometimes the easiest way to darken an area is to adjust the opacity for the
whole layer. As you lower the opacity, the darker image below shows through more
and more and that darkens the area. ![]()
6.
What if you only want to add a small section of one exposure to your various layers?
No problem to do that, but paste the entire exposure in first, to make sure everything
lines up exactly. Only then select and delete the parts you don’t want.![]()
Now let’s drop in those screen images.![]()
7.
If you shot a close up of the screen, here’s how you drop it in. First, draw a
clipping path outlining the exact shape of the projected image. Then “make selection.”
Now use the “paste inside” command to paste your close up image into the clipping
path you drew. Deselect the path in the paths window. ![]()
You’ll
find that the image you pasted will be too big and probably the wrong shape, but
that’s easy to fix. Use the “edit..transform...scale” command to roughly size
it, then use “distort” to bring each corner of the image exactly to the corner
of the image area of the screen. ![]()
More
than likely, you’ll end up with a thin white line between the pasted screen image
and the main image of the projection screen or monitor. You may get a thick line
or a colored blur if you shot the room with the projector or monitor on. To fix
it, you need to select the layer with the background image and touch it up, using
either the rubber stamp tool or the brush tool. If you have multiple layers making
up that background, you may need to merge them before you do the touch up. Be sure
not to merge the screen image at this point. ![]()
Finally,
because you shot a closeup of each screen, you may find that the screen image
is in better focus and has less “grain” or noise than the rest of the room. You
can use the blur and noise filters to match them up.
![]()
Camera RAW users: the process is the same, but you need to realize you will probably color correct the same exposure (or series of exposures) two different ways, once for color of the room, and once for the color of the projected image. (You will end up with two different jpg or tif files that you'll merge as I've described in PhotoShop.)
![]()
![]()

![]()
![]() 8.
If you shot the screen images from the original camera position, you need to put
the retouched room image on a layer above the screens. To do so, it's usually
easiest just to flatten your room image, then
copy it and paste it onto the image of the projector and monitor screens.
8.
If you shot the screen images from the original camera position, you need to put
the retouched room image on a layer above the screens. To do so, it's usually
easiest just to flatten your room image, then
copy it and paste it onto the image of the projector and monitor screens. ![]()
At
this point all you need to do is draw a clipping path for each screen, select
each in turn and hit the “delete” key, letting the correctly exposed screen show
through. (You may need to touch up the border between each screen and screen image
as described above.)![]()
9. I like to straighten out the various perspective
lines and correct any lens distortion before I finish an image. Generally, you
want to do this last, after you flatten the various layers and certainly before
you do any cropping. The original image below and the finished image at the top
of this page offer an extreme example of the process.![]()

If
you use wide angle lenses, the first thing to do is correct any barrel distortion
(curvature of straight lines, especially near the edges of the frame). Buy a PhotoShop
plug in like The Imaging Factory’s Debarrelizer. ![]()
Second,
use the edit-transform-perspective, rotate and distort commands to fix an image
that’s askew because you shot it from off-center. I like to bring all the vertical
lines in an image to parallel, but it’s a judgment call. Sometimes I’ll adjust
the horizontal as well. Watch out for distortion if you correct too much.
![]()
10.
I also like to clone out any dust or dirt at this point, as well as any stray
cables or other objects I may have overlooked.![]()
11.
Finally, a word on color correction. The “color balance,” “hue/saturation” and
“curves” commands in PhotoShop are all useful tools in this line. You can make
your shifts at any point in the process and change individual layers separately
if necessary. ![]()
It’s very
important, however, that your monitor matches up with whatever output device you’re
eventually going to print to. I use a Pantone SpyderPro to calibrate both my desktop
and laptop monitors. There are others that work as well, but a good calibrator
is an important tool.
![]()
An
example of this process in action![]()
Additional
finished photos created this way